Showing posts with label Revit. Show all posts

Tuesday, 30 July 2013

Foundation Level Issues

I started to notice some strange results from my foundation levels.  I have 750mm deep caps on level 00 (which is -150mm below ground/project zero.)  The bottom elevation should therefore read -900.  My schedule showed one cap with a -150 offset from base level which should have read 0.  I had a look in the model and it was in the correct location but the offset was still wrong.

image

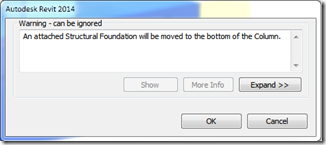
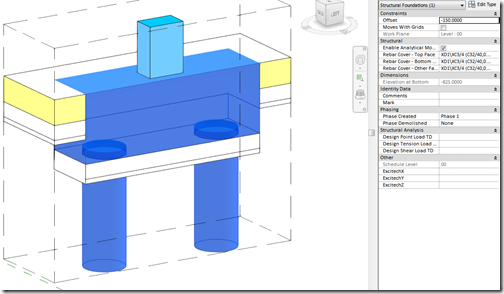
It turns out that the cap is fine until the offset is adjusted near to the bottom of the column.  Revit wants to attach the foundation to the column:

image

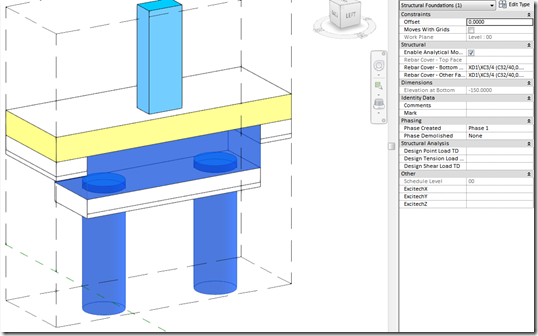
After this, the offset reads relative to Project zero and not the work plane it is hosted to.  This only happens if the foundation family is work plane based (See end of post about Z coordinates).  Below shows an offset of zero which puts it at project zero and not flush with the slab which is 150mm below:

image

Another issue I spotted can be tested with the new 2014 switch join tool.  I tried to edit the work plane but it was locked out:

image

I started to notice that my work plane options were disappearing once it was all joined in.  So I had a little go at testing it and got some odd results:

1.  As it ought to be but work plane options locked.

image

2. Switch join on slab, work plane options are back but elevation at bottom -150mm?

image

3. Switch join on Cellcore, work plane options are back but elevation at bottom -425mm?

image

It seems as though using switch join on more than one element locks out work plane options.  Without switch join, elevation at bottom is wrong and my geometry doesn’t work.  Switch join is great for cutting holes out of geometry without having to sketch them. 

Bottom line, offset and elevation at bottom are unreliable and columns irreversibly make foundations relative to project zero with work plane based families.

The free Excitech toolkit will schedule off the correct Z coordinate but the shared nested piles will only populate with the correct value if the host cap is work plane based; that is until 2014.  It appears that Excitech have tried to address the problem.  I noticed that in 2014 all of my foundations were failing to update.  If I un-ticked work plane based then they started to update.  Now my offsets are correct even when a column is involved.  Hopefully I won’t need coordinates for work plane based families.  Elevation at bottom is still incorrect if the slab cuts the cap but I can live with that.

This update to Excitech’s toolkit makes a big difference and now the foundations will play nice.  It is a shame that there seems to be no documentation that acknowledges these limitations and the fact they have been partly addressed in the 2014 release.

Ultimately I am looking for reliable results and to understand why work plane based families suffer these glitches.  We need to be able to create accurate real world coordinates for elements on site and trust what the software is telling us.

I have logged this with Autodesk and Excitech.  It is important to let developers know about these issues so they can fix them.  So many people complain about the short comings of software but never give feedback for it to be resolved.  If you have never logged a support request with Autodesk... why not!  They are there to help.
Wednesday, 24 July 2013

Tiny Text Has Vexed Me

Went back to an old project in 2013 and had to edit one of the materials.  I was surprised to see that the text had been washed at too high a temperature!  It was nothing that a restart wouldn’t fix.  Another fun moment with Revit Sarcastic smile

image

Monday, 20 May 2013

Solving Room Bounding Issues–Divide & Conquer!

I have answered a few forum posts in the past regarding Room Bounding issues.  I decided to write a post sharing a few tips for solving your problems.

When you place a room object you sometimes get this warning:

image

In a complex model it is not always obvious why this is happening.  The best thing to do is break the problem down logically to eliminate possible causes.  There are some obvious things to check such as:

Make sure that all of the elements are room bounding

image

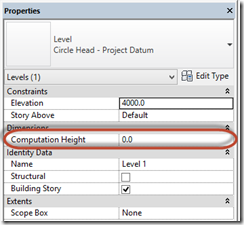
Less well known perhaps is to check the instance properties of a level datum to see the Computation Height

image

Also note that sketched profile openings and Wall Openings are not room bounding.  Use a Room Separation line to plug the gap or use empty door families to create openings.  They all yield different results so make sure you understand their workflows.  I will perhaps write a post on that if there is interest.

Problem Finding

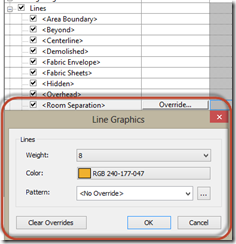
Start with changing your Visibility/ Graphic Overrides to make it easier to see what is happening:

imageimage

The Reference cross and Interior Fill boundary may give you a clue as to where the problem is:

image

This should show up when using the Room Placement tool.  In this example it is of course an obvious and contrived error.  The base of the wall has a 1mm offset and a Level Computation Height of 0mm to create the problem.  However, a similar scenario occurs when there is a strange wall join or joined geometry below.  There is always a good, logical reason why it is happening but it can seem quite irrational prior to finding a solution.  This often leads people to think this is just another one of Revit’s quirks.

This is more like what people come across:

image

Using the Room Separator can really help you focus in on the problem:

image

I call this ‘Divide & Conquer!’  Draw a Room Separator line to divide the room.  It doesn’t need to be equal.  Then place a room in each half:

image

You can see that one half is not bounding.  Divide that side and repeat:

imageimageimage

It starts to become obvious where the leak is.  You don’t want to get too fiddly so clean up what you have done and isolate the area you have identified with Room Separation lines, perhaps from the over side to clarify the point of interest (once you get a feel for it you only need two separating lines and you can nudge them):

image

Be aware that Revit has a tolerance for Rooms and will allow small gaps,  which in simple situations can be as much as 449.8mm unless there is another bounding element to leak through to:

imageimage

Now you know where to focus your attention.  Don’t forget the problem will be at the Computation Height, so that gives you an idea of elevation – then you have XYZ coordinates for the problem.  Create a 3D section around the area and start to digest the condition.

Wednesday, 8 May 2013

Revit 2014 installation issues

Hopefully most users won’t have any issues installing Autodesk products but issues can occur.  I am using Windows 8 64bit.  If you get a similar issue to me then this may help you fix it.
I downloaded the installation file which unpacked itself to C:\Autodesk.  Once it finished unpacking it immediately launched setup.exe which threw up this error: (lucky me)
image
You can locate LiteHtml.dll in the following folders:
  • C:\Autodesk\Autodesk_Revit_2014_English_Win_32-64bit_dlm\Setup
  • C:\Autodesk\Autodesk_Revit_2014_English_Win_32-64bit_dlm\x64\en-US\RVT2014\Program Files\Autodesk\Root\Setup\en-US\MRF\Setup\Setup
  • C:\Autodesk\Autodesk_Revit_2014_English_Win_32-64bit_dlm\x86\en-US\RVT2014\Program Files\Autodesk\Root\Setup\en-US\MRF\Setup\Setup
The setup is unable to see dll’s in any of its subfolders.  I copied the dll from the first location (since it is probably for the 32bit setup) into the same folder as the setup.exe and it was able to find LiteHtml.dll  since it went on to look for another dll.  So I copied the full set of dll’s and the setup.exe succeeded bringing up an install screen but then I got the LiteHtml.dll error again.  This time it was probably looking for the 64bit version but still using the one I copied into the root.  Perhaps Confused smile
Long story short…

Solution

This is what worked for me.  Paste all of the dll’s from:
C:\Autodesk\Autodesk_Revit_2014_English_Win_32-64bit_dlm\Setup
into
C:\Windows\SysWOW64
image
The setup then worked as originally anticipated and I was able to look forward to the new official release of Revit.

Sunday, 1 July 2012

Lock 3D Views!

When a 3D view has been setup for a sheet and you have the angle you want, don't forget to lock it. This will stop others from messing it up… as well as you!

image

Saturday, 23 June 2012

No Help!


When you enter a search term within Revit,     image
your internet browser is launched to display Autodesk WikiHelp.
It may return no results:-
image
No worries. Just type your search in the webpage instead and you should get some results.  To save time, don’t bother typing it in Revit.  Just click on the binoculars icon instead.

Edit: If you experience this problem then contact your IT department.  It may be due to proxy restrictions stopping the search term from being passed to the web page.

Sunday, 17 June 2012

Ctrl + ←=Speed

I have always been an advocate of keyboard shortcuts and in my AutoCAD days didn't have a toolbar in sight. Shortcuts can really boost productivity and keep the mouse close to the action rather than flying around the screen.

I have found many users to be resistant to using shortcuts and their workflow can suffer as a result. I think it is perhaps off putting to many having to remember so many abstract key combinations.

My approach is to tackle one shortcut at a time. If you are carrying out a repetitive task then take note of the shortcut for the tool and use it. It will soon lodge in your brain.

Revit is helpful here. Just hover over the tool on the ribbon to display a tool tip. You will see a keyboard combination in brackets.

Shortcut tooltip

If not, then a keyboard shortcut has not been assigned.  Why not assign one now? Adding Keyboard Shortcuts in Revit

Don’t be tempted to click the button.  Now is your first opportunity to use the shortcut.  I will perhaps write about custom Revit shortcuts in the future but I wanted to bring some others to your attention that will help you improve productivity and reduce repetitive strain injury.  Don’t forget to use Ctrl+Tab to switch between open views.

System Shortcuts

General shortcuts are available in a whole host of programs so you will reap benefits when emailing, word-processing or organising folders and files.  There are many available in windows but here are a few which really speed up text editing, especially in Revit.

  • F2 to rename.  Try selecting a view in the project browser and rename it.
  • Use Ctrl with cursor (arrow) keys to skip entire words(ßà) or paragraphs(á â) at a time.
  • Hold Ctrl+Shift (I hold them with one finger) with cursor keys to select entire words or paragraphs at a time.
  • Hold Ctrl with backspace or delete to delete entire words at a time.
  • Home Shift+End or Home to select whole lines whole lines.

The Home and End keys are really overlooked.  They are above the cursor keys on the keyboard.  I find this useful in Revit when you cannot see the entire line of text.  Press the end key to skip to the end of the line.  This is great in the modeless properties palette where moving mouse outside of it applies changes.

Try this next example to move a word from the end of a line to the beginning:

Press End, then Hold Ctrl+Shift and press ß(just tap), then Ctrl+X, then Home, then Ctrl+V, then Spacebar.

Thursday, 7 June 2012

Mass - Update to face

Curious little situation I came across in Revit 2013.  Not sure if this happened on previous versions.

I created a roof using a mass form.  Of course changes were needed so I edited the in-place mass and hit finish.  I highlighted the roof but the Model by Face options were greyed out as shown in the image below.

clip_image001

There seems to be simple fix to work around this issue.  With the roof highlighted, shape handles are available.

clip_image002

Dragging a shape handle will bring up a warning dialog.  Just hit cancel. (if it doesn’t then just hit undo)

clip_image003

Now your options are available.  Go ahead and click Update to Face.

clip_image004

Seems as though you have to give a little bump to wake thing up.  Thank you Revit for keeping it user friendly Winking smile

Tuesday, 29 May 2012

Join Slabs–Inlays and Areas Part 2

I wanted to follow on from my last post with more of a real world example.  This time to show a simple junction using the same technique.  If you are using this method for layouts in plan then I would normally start of with a slab of grass covering the whole site.  Then add outer pavement boundaries, followed by roads.  Once the road has been joined to the paving it will leave a pavement (sidewalk) either side.

However, if you want to show 3D with levels then you will need to plan a little.  Try to decide what element will have the lowest level.  In the example below it is the road.  Therefore, the slab covering your site should be the road.  Now you can add the other elements.

Union Slab 2

You can see in the image below that I have used paving to define the boundary of the road but haven’t worried about the outside edge.  As with the road, I have have used the grass to define the paving.  Then the floor elements are joined in reverse order.  There will be exceptions where perhaps the grass level drops below the paving.  Just sketch a hole for it to sit in or better yet, use the opening tool.  Mix it up all you like!

Union Slab 2 Stack

When you want to add a little detail to your presentations, create a curb profile for a slab edge and apply it to the paving. 

Union Slab 2 Curb

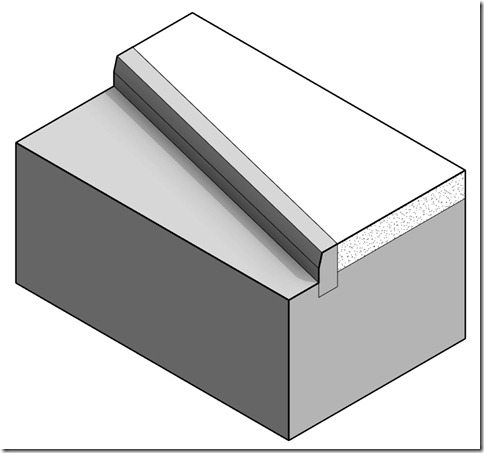
You could even use Shape Editing to create drop curbs for driveways!

(The drop curb itself will need to be an in-place sweep.  Use voids to cut the ends if they won’t clean up properly by joining them to the slab edge.)

image

Union Slab 2 Driveway

Monday, 28 May 2012

Join Slabs - Inlays and Areas

Since this year marks our Queens Diamond Jubilee here in the UK, I felt that this post could be fitting for the occasion.

When producing simple site layouts in Revit I like to use floor slabs.  Of course this would not be appropriate for complex terrain but conceptual sites or setting out benefit from a simplified approach.  Topo can often be over complex to work with and sub regions can’t overlap.

I have seen many users draw floor boundaries around OS plans and trace along each adjoining edge.  This works but often you have to draw over the same line twice.  What’s worse, if a path or road changes then you have to update adjoining slabs too!

So lets take our site below.  Unlikely perhaps but you may be showing patriotic flower beds on your site.

Union Slab

The end result can be achieved in the manner I described above.  However, there is a slightly simpler approach which will reduce drafting time.  The trick is to place a large slab and then simply draw the inlays or islands.  Then join the inlays to the slab (join order is important here, first pick cuts into the second pick) to cut the pieces.

Union Slab 3D

The image below shows each piece separated out.  Red joins into White and White joins into Blue.

Union Slab 3D Stack

If you need to offset levels then things get a little tricky.  The levels have to go in the order they are joined.  For instance, the Blue slab must be the lowest point.  If you want the White to be the lowest point then make that the slab and cut Blue pieces into that.  In practical use the slab will be grass or road.  Try using slab edges to create curbs.